Tag Archives: Panel

Artisan Pro X Panel for Adobe Photoshop v1.3

The future of B&W photo editing software is not just in providing tools, but more importantly, in providing a proven and dedicated workflow method, based on experience, and expertise, that every serious B&W artist can benefit from. We’ve automated all those elements in B&W Artisan Pro X. With dedication and without limitations. – Joel Tjintjelaar

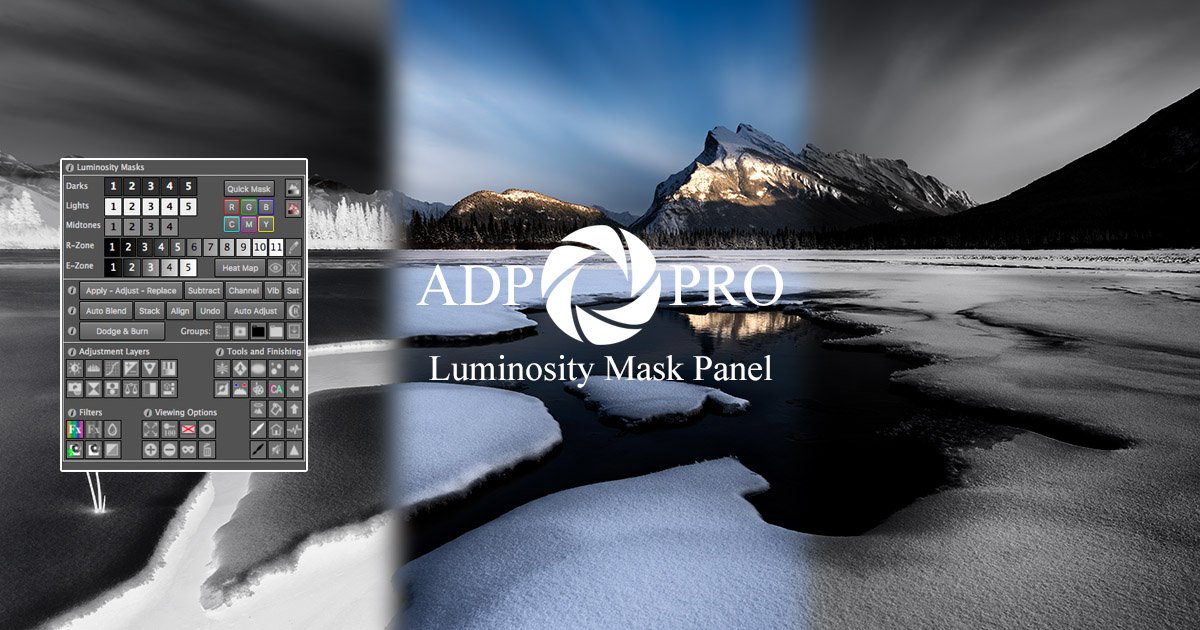
Intuitive B&W Editing Panel
An intuitive B&W editing panel, developed by award-winning photographer and educator Joel Tjintjelaar.

Advanced B&W Processing Without technical knowledge
No need to acquire technical knowledge and years of practice in PS. This panel unlocks Joel’s advanced B&W techniques, from his iSGM method, with the single click of a button, sometimes triggering over 100 steps in PS. The artist retains full artistic control as the presets don’t have an ‘artistic effect’, but only cover the technical part of adjustments.

Create Depth & Special Effects *NEW*
Easily add 3D depth and presence to buildings, skies, seascapes or any other object using the built-in dynamic gradients. Or add reflections or streaks of clouds to your images using the Special FX menu. With 200 new built-in functions, and with the highly customizable Special FX, anything is possible.

Powerful Local Adjustment features
24 presets – Precise and fast local lightening/darkening, using automatic variable feathering (NEW with X), are enabled by quick, free-form selections with a lasso tool, and then clicking darken/lighten for subtle and seamless adjustments

Advanced Micro Zone Local Adjustments
154 presets – For advanced local contrast/texture adjustments, the Micro-Zone adjustments only affect the tones in the range you’ve selected within the target area using 16 bits advanced custom-built asymmetrical masks and dynamic feathering.

Mask Optimization Feature
The panel has an automatic mask optimization feature that will reduce fringing and halos substantially.

Homepage https://www.bwvision.com/bw-artisan-pro-panel/

Name: BW_Artisan_Pro_X_v130_Mactorrents.io.zip
Size: 14.0 MB
Files BW_Artisan_Pro_X_v130_Mactorrents.io.dmg[14.0 MB]

   Download

ADP Pro v3.2 Luminosity Mask Panel for Photoshop

A comprehensive and innovative Luminosity Mask panel designed in a compact and easy to use design. ADP Pro v3 has been designed to bring you all of the power of luminosity masks, and much more. Whether you want to take complete tonal control over your images or create stunning monochrome images, apply powerful colour adjustments or sharpen images with unpresendented control you can’t go past ADP Pro v3. Whether you are a beginner to luminosity masks or you are an advanced user, the tools in ADP Pro v3 have been built to create your masks simply, quickly with all the adjustment tools you’ll ever need.

Included with your purchase:
ADP Pro v3, including the following panels:
Luminosity With Layers
Quick Mask Luminosity Masks
Heat Map Tonal Selections
Apply, Adjust, Replace (Image and Mask View)
Subtraction Masks
Channel Masks
Automated Blending & Undo Blending
Auto Adjustments
Dodge & Burn
Create Your Own
Colour FX
Mono FX
Sharpening

Homepage http://www.adppro.com/product/adp-pro-v3-luminosity-mask-panel/

Screenshots

Name: ADP_LumiFlow_v3.2-ManualInstall_Mactorrents.io.rar
Size: 2.35 M
Files ADP_LumiFlow_v3.2-ManualInstall_Mactorrents.io.rar[2.35 MB]

   Download

Raya Pro 4.0 Suite – Luminosity Masking Panel for Photoshop

The Panels That Make Photoshop And Exposure Blending Simple

All Raya Pro Features

    • Auto Exposure blending for complete beginners
    • 48 different 16 Bit Luminosity Masks
    • 16 Bit Precision Masks
    • Easy Filters
    • Instant Digital Blending Method 1: Rapid Blend If
    • Instant Digital Blending Method 2: Apply Image
    • Instant Digital Blending Method 3: Gradient Masks
    • Instant Digital Blending Method 4: GMs + Apply Image
    • Instant Digital Blending Method 5: Range Masks
    • Layer Any Exposures With One Click
    • Auto-Align All Layers
    • Select Luminosity Masks With One Click, Without Going To The Channels Palette
    • Subtract Any Luminosity Mask From A Selection With One Click
    • View Black & White Mask With One Click
    • Colour Zones
    • Saturation Masks
    • Sharpening Without Edging
    • Frequency Separation (16 bit & 8 bit)
    • Use a Simple Slider To Create & Shape Luminosity Masks For a Perfect Selection
    • Use 4 Of Jimmy’s Shadow Luminosity Masks Presets With One Click, To Make Accurate Shadow Selections Without Intersecting Channels
    • CC 2014 & CC 2015 Users Benefit From The New Range Mask Function, Created By Jimmy McIntyre – They Make Extremely Accurate Luminosity Masks
    • Easy One-Click Buttons, Like Delete, Make Smart Object, and Deselect, That Will Speed Up Your Workflow
    • Merge All Files Non-Destructively
    • 3 Auto-Colour Correct Buttons
    • Manual Colour Correct Button
    • Easy Adjust Any Colours In Your Image
    • Easy Filters For Instant Improvements
    • Contrast Zones
    • Turn Your Photo Black & White
    • 4 Orton Effects
    • Many Dodge & Burn Options
    • Detail Enhancers
    • Clean Chromatic Aberration
    • Easy Vignettes
    • Create Autumn Colours
    • Make Your Image Glow
    • Make Your Sunset/Sunrise Glow
    • 6 Custom Buttons: You Decide Their Function!
    • Perfect Sharpening & Web Preparation, Which Leaves Your Images Sharp, With The Ideal Colour Profile And Size
    • Targeted Contrast
    • Make Targeted Colours More Vivid/Desaturated
    • Apply A Precise Mask To Any Layer To Make Your Image Cleaner
    • Noise Removal
    • Fake HDR
    • Full Size Sharpening
  • Contrast Punch

Homepage https://www.shutterevolve.com/raya-pro-the-ultimate-digital-blending-workflow-panel-for-photoshop/

Name: Raya_Pro_4.0_Suite_Mactorrents.io.zip
Size: 22.1 MB
Files Raya_Pro_4.0_Suite_Mactorrents.io.dmg[22.1 MB]

   Download

Lumenzia (Luminosity Masking Panel) v8.1 for Photoshop

Download Lumenzia (Luminosity king Panel) v8.1 for Photoshop

Luminosity masks allow you to create gorgeous and realistic edits in Photoshop. Lumenzia allows you to use use them quickly and easily. Its advanced javascript engine handles all the luminosity masking complexity for you in the background, so all you need to think about is making beautiful images.

Key Benefits:

  • Select and mask anything, visually! With Lumenzia, you get a full screen preview of the mask before you apply it. Interactively click on the image to select (or deselect) the tones/colors to the degree you wish. No guesswork with adding and subtracting channels. Isolate the mask to to specific parts of the image with a simple selection. And you can combine group masks to easily see the overall mask impact. It’s never been faster and easier to create or customize the right mask. And the masks are created in 16-bits, allowing for smooth transitions in extreme masks.
  • Click to pick! You don’t have to know which mask to use, just use the built-in zone and range tools to create the right mask automatically.
  • It’s stays out of the way. Lumenzia offers a compact panel with only the buttons you need, and completely eliminates the need for the channels pallet. This leaves room to easily see your images big and beautiful, even on a laptop screen. Every action in Lumenzia creates just a single history step, so you can undo anything with <ctrl>-Z. And because Lumenzia is programmed in javascript, it’s smart enough to take care of errors and other tricky situations for you.
  • Simplify exposure blending. Automatically stack, align, and sort your exposures light to dark for blending.
  • Smaller files. Lumenzia doesn’t use channels, so your files stay small. A typical TIF file from a Nikon D800 grows from 200MB to 1.4GB when creating channel masks, but would remain the same 200MB size in Lumenzia. And Lumenzia can combine group masks to significantly cut down on file size, often reducing file size by 20-50%!
  • Beautiful vignettes with ease. Just draw a selection around the target area to create a vignette of any size, sharp, or position in the image. The vignette can be easily modified, inverted (to lighten the center) or combined with luminosity masks (to avoid darkening shadows too much).

Lumenzia features:

  • Streamlined workflow and completely custom masks
  • Sliders to easily customize the perfect luminosity mask
  • BlendIf and Vector masks (to save significant file space and avoid the need to update masks)
  • Ability to see and edit luminosity selections just like a layer mask
  • Add, subtract, or intersect any mask or selection for advanced control
  • Color masks (select by color and/or luminosity, visually)
  • Local Contrast Enhancement (easily and automatically bring out more detail)
  • Live masks (see the blended result immediately and try different masks)
  • Zone masks for precise refinement
  • Zone and Range pickers (select the right mask visually by clicking on the image)
  • Zone maps to visualize the image in zones 0-10 or show blown highlights/shadows
  • “Lighter/Darker” masks (select pixels relative to surrounding pixels)
  • Edge and Surface masks for halo removal and avoiding sharpening noise.
  • Refine masks to specific locations or colors in the image
  • Combine masks (merge group masks to save space and see exactly what is masked)
  • Advanced dodging and burning: revise dodge color/brightness, visual editing
  • Support for paths, to facilitate use of luminosity masks with hard edges in architecture
  • Split-screen to see the mask and image simultaneously
  • “PreBlend” to automatically stack, align, and sort exposures for blending
  • Save files >4GB which can be viewed in Lightroom
  • Custom vignettes
  • Non-destructive sponge tool (advanced saturation painting)
  • Saturation masks (color-specific vibrance control)
  • Apply or replace masks on existing layers with a single click
  • Luminosity and dust visualization tools to easily find and fix defects
  • Advanced sharpening methods for portraits (surface blur) and landscape (high pass)
  • Recordable actions to include light and dark masks/selections in your own actions.
  • Training and support videos, as well as a comprehensive written manual

Information

CompatibilityRequirementsAdobe Photoshop CS6 or later
LanguagesEnglish

What’s New in Lumenzia (Luminosity king Panel) v8.1 for Photoshop

  • Release notes not available at the time of this post.

Screenshots

Name lumenzia 8.1.0 PS
Size 133.0 MB
Created on 2019-11-12 08:20:03
Hash 21ac6ef9b27c7546a73e57e7ef23064b2e483c4e
Files lumenzia 8.1.0 PS (133.0 MB)

Lumenzia (Luminosity king Panel) 8.0 for Photoshop

Download Lumenzia (Luminosity king Panel) 8.0 for Photoshop

Luminosity masks allow you to create gorgeous and realistic edits in Photoshop. Lumenzia allows you to use use them quickly and easily. Its advanced javascript engine handles all the luminosity masking complexity for you in the background, so all you need to think about is making beautiful images.

Key Benefits:
  • Select and mask anything, visually! With Lumenzia, you get a full screen preview of the mask before you apply it. Interactively click on the image to select (or deselect) the tones/colors to the degree you wish. No guesswork with adding and subtracting channels. Isolate the mask to to specific parts of the image with a simple selection. And you can combine group masks to easily see the overall mask impact. It’s never been faster and easier to create or customize the right mask. And the masks are created in 16bits, allowing for smooth transitions in extreme masks.
  • Click to pick! You don’t have to know which mask to use, just use the builtin zone and range tools to create the right mask automatically.
  • It’s stays out of the way. Lumenzia offers a compact panel with only the buttons you need, and completely eliminates the need for the channels pallet. This leaves room to easily see your images big and beautiful, even on a laptop screen. Every action in Lumenzia creates just a single history step, so you can undo anything with Z. And because Lumenzia is programmed in javascript, it’s smart enough to take care of errors and other tricky situations for you.
  • Simplify exposure blending. Automatically stack, align, and sort your exposures light to dark for blending.
  • Smaller files. Lumenzia doesn’t use channels, so your files stay small. A typical TIF file from a Nikon D800 grows from 200MB to 1.4GB when creating channel masks, but would remain the same 200MB size in Lumenzia. And Lumenzia can combine group masks to significantly cut down on file size, often reducing file size a further 2050%!
  • Beautiful vignettes with ease. Just draw a selection around the target area to create a vignette of any size, sharp, or position in the image. The vignette can be easily modified, inverted (to lighten the center) or combined with luminosity masks (to avoid darkening shadows too much)

.

The Lumenzia panel features:
  • Customizeable luminosity masking presets
  • Zone masking system
  • Zone pickers (select the right zone mask visually by clicking on the image)
  • Range picker (select any range of midtones visually by clicking on the image)
  • “Lighter/Darker” masks (select pixels relative to surrounding pixels)
  • Refine masks to specific locations or colors in the image
  • Combine masks (merge group masks to save space and see exactly what is masked)
  • Splitscreen to see the mask and image simultaneously
  • “PreBlend” to automatically stack, align, and sort exposures for blending
  • Custom vignettes
  • Dodging and burningSaturation masks (colorspecific vibrance control)
  • Apply or replace masks on existing layers with a single click
  • Luminosity and dust visualization tools to easily find and fix defects
  • Advanced sharpening methods for portraits (surface blur) and landscape (high pass)
  • Quick access to training and support videos (via “tutorials” button)

Information

Compatibility
RequirementsAdobe Photoshop CS6 or later
Languages
English

What’s New in Lumenzia (Luminosity king Panel) 8.0 for Photoshop

  • Release notes not available at the time of this post.

Screenshots

Name Lumenzia 8.0.0 mac-torrents.net.zip
Size 125.5 MB
Created on 2019-10-28 19:12:39
Hash 5d350a2643c207c140141ca9dbfeb2161b31e92b
Files Lumenzia 8.0.0 mac-torrents.net.zip (125.5 MB)

Download

Color Master Smart Photoshop Panel (Win/Mac)

Name Color Master Smart Photoshop Panel Win Mac – mac-torrents.net.rar
Size 102.4 MB
Created on 2019-08-28 02:41:04
Hash 037defba62e07621f2594bf60ca966415820f7c5
Files Color Master Smart Photoshop Panel Win Mac – mac-torrents.net.rar (102.4 MB)

Download

Descriptions for Color Master Smart Photoshop Panel (Win/Mac)

To make the color correction with LUT simple and convenient, we developed a special panel called ““.

In addition, more than 20 professional LUT profiles are incorporated, which are compiled according to the popular color schemes and automatically combine the colors of the image harmoniously.

As a result, you no longer need to think about color harmonies, select color schemes and deal with all the tools in Photoshop.

The Color Master panel is designed according to all Adobe standards and is installed in Photoshop fully automatically on both Windows and MAC.

Photo Controller Panel Plug-in for Adobe Photoshop (Win/Mac)

Download

Photo Controller Panel Plug-in for Adobe Photoshop (Win/Mac)

This panel is an amazing tool for a retoucher and for a photographer. It keeps you away from boring technical Photoshop settings and gives you more time to focus on your work.

Frequency Separation – a way to retouch, in which the image is separated into two frequencies (low and high or in other words: texture and volume) that allows you to work on each frequency separately. Together with Photoshop tools, this method provides a very flexible application and high quality results.

Features:
  • Retouch by Frequency Separation
  • Dynamic Smart Contrast
  • Dynamic Film Grain and Sharpen
  • Dymanic Color Enhance
  • Multi Tint Effect
  • 4 contrast and 4 matte color presets
  • Quick launch panel by hotkey
  • Tutorials video are included
Requirements:
  • Panel available for Photoshop CS5.0 CS5.5, CS6, CC, CC2014, CC2015, CC2017, CC2018
  • Support all languages
  • Support Mac and Windows

Web Site: Photo-Controller-Photoshop-Panel

Screenshots

Name Photo Controller Panel Plugin for Adobe Photoshop Win Mac.rar
Size 3.52 MB
Created on 2019-08-20 22:55:58
Hash d8401dda4807f67717efa0d798d53e83aebc30c6
Files Photo Controller Panel Plugin for Adobe Photoshop Win Mac.rar (3.52 MB)

Download

RA Beauty Retouch Panel 3.2 with Pixel Juggler for Adobe Photoshop CC 2019

Name RA Beauty Retouch Panel 3.2 with Pixel Juggler for Adobe Photoshop CC 2019.zip
Size 57.89 MB
Created on 2018-10-24 06:02:18
Hash f5be616a6f863e0314d513786af89ba036ba4da2
Files RA Beauty Retouch Panel 3.2 with Pixel Juggler for Adobe Photoshop CC 2019.zip (57.89 MB)

Descriptions for RA Beauty Retouch Panel 3.2 with Pixel Juggler for Adobe Photoshop CC 2019 macOS

Beauty Retouch panel combines basic Beauty retouching scripts, tool and adjustment layer shortcuts, which will add simplicity to and speed up your workflow by performing the tedious and repetitive parts of your routine. Utilizing a few advanced and extremely helpful scripts, as well as the ability to add custom User Actions, this extension panel will also save you hours of work in the short and long term as well as help you achieve accurate, repeatable top-quality results, and impress your clients!

The Beauty Retouch Workflow Accelerator is a Photoshop extension panel designed to help photographers and retouchers speed up their Beauty, Fashion & Portrait retouching workflow and increase the quality of their retouching results. It is compatible with officially licensed versions of Adobe Photoshop: from CS6 to CC2018.

Fire Up Your Workflow!

The Beauty Retouch v3.0 Workflow Accelerator is a Photoshop extension panel created by a team of Retouching Academy experts to help photographers and retouchers speed up their Beauty, Fashion, & Portrait retouching workflow and increase the quality of their finished product.

Beauty Retouch v3.1 panel combines basic Beauty retouching scripts, tool and adjustment layer shortcuts, which will add simplicity to and speed up your workflow by performing the tedious and repetitive parts of your routine. Utilizing a few advanced and extremely helpful scripts, as well as the ability to add custom User Actions, this extension panel will save you hours of work in the short and long term as well as help you achieve accurate, repeatable top-quality results, and impress your clients!

And the best part – our panel will allow you to de-clutter your workspace, close out unnecessary Photoshop panels, and have all of your main actions and tool buttons sitting right where you want them, all in one place. In the latest version of the Beauty Retouch panel you can also add your own custom User Actions.

RA Panel: Pixel Juggler

We are also happy to announce that along with the Beauty Retouch v3.0 panel, we have created our Pixel Juggler, a free panel that simplifies access to regularly used functions typically hidden in various menus. The Pixel Juggler panel is also our test panel for you to ensure that RA Panels can be installed and work properly on your computer before you purchase the Beauty Retouch Workflow Accelerator.

When both our RA panels are installed and placed into one tab group, you can easily switch between them to access the desired functions and buttons. The more you work with these super handy panels, the quicker your workflow will become!

Web Site: Web Site: http://retouchingacademy.com/product/beauty-retouch-panel/

What’s New in RA Beauty Retouch Panel 3.2 with Pixel Juggler for Adobe Photoshop CC 2019

  • Release notes not available at the time of this post.

Screenshots

Raya Pro Panel 3.0 Plug-in for Adobe Photoshop CS6 – CC 2018

Raya Pro Panel 3.0 Plug-in for Adobe Photoshop CS6 – CC 2018 (Win/macOS)

The panel that makes Photoshop and Digital Blending simple. Raya Pro is one of the finest panels for Photoshop. It makes digital blending extremely easy – just a click of a button and the blending is done.

Features of Raya Pro 3:

Blend Exposures With Ease
  • Works in ALL Languages
  • Instant Digital Blending
Techniques
  • 16 Bit Luminosity Masks Made Easy
  • Jimmy’s Presets:
  • 3 Beautiful Sharpening Tools
Beautiful Images With A Few Clicks
  • 4 Magical Orton Effects
  • Dodge & Burn With Ease
  • Enhance Incredible Details
  • Awesome Filters
  • Clean CA
  • Frequency Separation
  • Easy Vignettes
Speed Up & Simplify Your Workflow
  • 6 Custom Buttons: You
Decide Their Function!
  • Make Your Images Perfect For The Web
  • Beautiful Golden Hour Glow
  • Amazing Sharpening Technique
All Raya Pro Features:
  • Auto Exposure blending for complete beginners
  • 48 different 16 Bit Luminosity Masks
  • 16 Bit Precision Masks
  • Easy Filters
  • Instant Digital Blending Method 1: Rapid Blend If
  • Instant Digital Blending Method 2: Apply Image
  • Instant Digital Blending Method 3: Gradient Masks
  • Instant Digital Blending Method 4: GMs + Apply Image
  • Instant Digital Blending Method 5: Range Masks
  • Layer Any Exposures With One Click
  • AutoAlign All Layers
  • Select Luminosity Masks With One Click, Without Going To The Channels Palette
  • Subtract Any Luminosity Mask From A Selection With One Click
  • View Black & White Mask With One Click
  • Colour Zones
  • Saturation Masks
  • Sharpening Without Edging
  • Frequency Separation (16 bit & 8 bit)
  • Use a Simple Slider To Create & Shape Luminosity Masks For a Perfect Selection
  • Use 4 Of Jimmy’s Shadow Luminosity Masks Presets With One Click, To Make Accurate Shadow Selections Without Intersecting Channels
  • CC 2014 & CC 2015 Users Benefit From The New Range Mask Function, Created By Jimmy McIntyre They Make Extremely Accurate Luminosity Masks
  • Easy OneClick Buttons, Like Delete, Make Smart Object, and Deselect, That Will Speed Up Your Workflow
  • Merge All Files NonDestructively
  • 3 AutoColour Correct Buttons
  • Manual Colour Correct Button
  • Easy Adjust Any Colours In Your Image
  • Easy Filters For Instant Improvements
  • Contrast Zones
  • Turn Your Photo Black & White
  • 4 Orton Effects
  • Many Dodge & Burn Options
  • Detail Enhancers
  • Clean Chromatic Aberration
  • Easy Vignettes
  • Create Autumn Colours
  • Make Your Image Glow
  • Make Your Sunset/Sunrise Glow
  • 6 Custom Buttons: You Decide Their Function!
  • Perfect Sharpening & Web Preparation, Which Leaves Your Images Sharp, With The Ideal Colour Profile And Size
  • Targeted Contrast
  • Make Targeted Colours More Vivid/Desaturated
  • Apply A Precise Mask To Any Layer To Make Your Image Cleaner
  • Noise Removal
  • Fake HDR
  • Full Size Sharpening
  • Contrast Punch

Requirements: CS6 and CC (including the latest version of CC)​

Web Site: https://www.shutterevolve.com/raya-pro-the-ultimate-digital-blending-workflow-panel-for-photoshop/

Name Raya Pro Panel 3.0.dmg
Size 107.6 MB
Created on 2018-06-14 10:44:46
Hash 3b78d80b3825da94808e7e265d803d62e7e5d5e0
Files Raya Pro Panel 3.0.dmg (107.6 MB)

RA Beauty Retouch Panel 3.2 for Adobe Photoshop

RA Beauty Retouch Panel 3.2 for Adobe Photoshop macOS

Beauty Retouch v3.2 panel combines basic Beauty retouching scripts, tool and adjustment layer shortcuts, which will add simplicity to and speed up your workflow by performing the tedious and repetitive parts of your routine. Utilizing a few advanced and extremely helpful scripts, as well as the ability to add custom User Actions, this extension panel will also save you hours of work in the short and long term as well as help you achieve accurate, repeatable top-quality results, and impress your clients!

OUR JOB IS TO EMPOWER RETOUCHERS LIKE YOU!

Please view the USER MANUAL.PDF file, which is included in the installation package, it explains the functionality of the Beauty Retouch panel, as well as how the key retouching techniques can be performed faster and better with the help of our panel.

FIRE UP YOUR WORKFLOW!

The Beauty Retouch v3.2 Panel is a Photoshop extension panel created by the Retouching Academy team of professional photographers and retouchers to help fellow-artists speed up their Beauty, Fashion, & Portrait retouching workflow and ultimately increase the quality of their finished product.

Beauty Retouch v3.2 panel combines basic Beauty retouching scripts, tool and adjustment layer shortcuts, which will add simplicity to and speed up your workflow by performing the tedious and repetitive parts of your routine.

Utilizing a few advanced and extremely helpful scripts, as well as the ability to add custom User Actions, this extension panel will save you hours of work in the short and long term as well as help you achieve accurate, repeatable top-quality results, and impress your clients!

Web Site: Web Site: http://retouchingacademy.com/product/beauty-retouch-panel/

What’s New in RA Beauty Retouch Panel 3.2

  • Release notes not available at the time of this post.

Screenshots

Name RA Beauty Retouch Panel 3.2 for Adobe Photoshop macOS.zip
Size 61.50 MB
Created on 2018-06-14 09:59:47
Hash 78600af6773d10093703cb031d50c3c6144d0ffd
Files RA Beauty Retouch Panel 3.2 for Adobe Photoshop macOS.zip (61.50 MB)

Pixel Film Studios Transtortion – Distorted Panel Transitions in Final Cut Pro X

Descriptions for Pixel Film Studios Transtortion

Amaze your audience with a panel flashing distortion transition effect all within Final Cut Pro X. With Transtortion users can create a transition of their own with a click of a mouse. Each users has total control over start offset, transition time, shake, layer amount, edge softness, prism, brightness, and more. With easy to use on-screen controls users have the ability to create a new look every time.

Web Site: https://store.pixelfilmstudios.com/product/transtortion/

Find more Pixel Film Studio Plugins

Film Distortion Effects with Transtortion in Final Cut Pro X

Control the Chaos in FCPX

Control the Chaos from one scene to another with Transtortion from Pixel Film Studios. With Transtortion users have the ability to generate a new distorted panel transition with a click of a mouse leaving room for endless possibilities. Users have total control over layer amount, horizontal shake, vertical shake, twist, offset, brightness, prism, and more all within Final Cut Pro X.

Infinite Possibilities

With Transtortion creating a new transition is just a click and drag away. With easy to use on-screen controls the possibilities are truly endless. Users have total control over twist, shake, layer amount, edge softness, start offset, transition time, position, brightness, prism, and more. With Transtortion users can select from up to 4 horizontal or vertical panels. Users can create their own shape with up to 10 control points all with a click of a mouse all within Final Cut Pro X.

On-Screen Controls

With Transtortion on-screen controls users are given the ability in creating their own shape with up to 10 control points. Users can select from horizontal panels, vertical panels, and customizable shapes all with on-screen control leaving room for total customization. With Transtortion users can alter the over overall look and feel of each transition with a click of a mouse all within Final Cut Pro X.

Designed for Final Cut Pro X

Transtortion was professionally designed to work seamlessly inside of Final Cut Pro X. As a transition effect, each Transtortion preset can be dragged and dropped onto media and previewed in real time. With the published parameters found in the FCPX inspector, users have the ability to make further adjustments with just a few clicks of a mouse.


Pixel Film Studios Transtortion – Distorted Panel Transitions in FCPX

Name Pixel Film Studios – Transtortion.dmg
Size 25.38 MB
Created on 2018-03-27 04:21:39
Hash 69ee0ddc7e7adab35014491d52d0f27569d69edf
Files Pixel Film Studios – Transtortion.dmg (25.38 MB)

RA Beauty Retouch Panel 3.1 with Pixel Juggler for Adobe Photoshop CC 2018.1.1

Descriptions for RA Beauty Retouch Panel 3.1 with Pixel Juggler for Adobe Photoshop CC 2018.1.1

Name: RA Beauty Retouch Panel
Version: 3.1
Mac Platform: Intel
OS Version: OS X 10.7 or later
Photoshop Version: CS6 – CC 2018.1.1

Web Site: http://retouchingacademy.com/product/beauty-retouch-panel/

Overview

Beauty Retouch panel combines basic Beauty retouching scripts, tool and adjustment layer shortcuts, which will add simplicity to and speed up your workflow by performing the tedious and repetitive parts of your routine. mac-torrents.net Utilizing a few advanced and extremely helpful scripts, as well as the ability to add custom User Actions, this extension panel will also save you hours of work in the short and long term as well as help you achieve accurate, repeatable top-quality results, and impress your clients!

The Beauty Retouch Workflow Accelerator is a Photoshop extension panel designed to help photographers and retouchers speed up their Beauty, Fashion & Portrait retouching workflow and increase the quality of their retouching results. It is compatible with officially licensed versions of Adobe Photoshop: from CS6 to CC2018.

Fire Up Your Workflow!

The Beauty Retouch v3.0 Workflow Accelerator is a Photoshop extension panel created by a team of Retouching Academy experts to help photographers and retouchers speed up their Beauty, Fashion, & Portrait retouching workflow and increase the quality of their finished product.

Beauty Retouch v3.1 panel combines basic Beauty retouching scripts, tool and adjustment layer shortcuts, which will add simplicity to and speed up your workflow by performing the tedious and repetitive parts of your routine. Utilizing a few advanced and extremely helpful scripts, as well as the ability to add custom User Actions, this extension panel will save you hours of work in the short and long term as well as help you achieve accurate, repeatable top-quality results, and impress your clients!

And the best part – our panel will allow you to de-clutter your workspace, close out unnecessary Photoshop panels, and have all of your main actions and tool buttons sitting right where you want them, all in one place. In the latest version of the Beauty Retouch panel you can also add your own custom User Actions.

RA Panel: Pixel Juggler

We are also happy to announce that along with the Beauty Retouch v3.0 panel, we have created our Pixel Juggler, a free panel that simplifies access to regularly used functions typically hidden in various menus. mac-torrents.net The Pixel Juggler panel is also our test panel for you to ensure that RA Panels can be installed and work properly on your computer before you purchase the Beauty Retouch Workflow Accelerator.

When both our RA panels are installed and placed into one tab group, you can easily switch between them to access the desired functions and buttons. mac-torrents.net The more you work with these super handy panels, the quicker your workflow will become!

What’s New in RA Beauty Retouch Panel 3.1

  • Release notes not available at the time of this post.

Screenshots

Name RA Beauty Retouch Panel 3.1 with Pixel Juggler for Adobe Photoshop CC 2018.dmg
Size 4.95 MB
Created on 2018-02-20 12:46:04
Hash 0047bb8cf26b207f31f55a7af84980ea8fbf92a2
Files RA Beauty Retouch Panel 3.1 with Pixel Juggler for Adobe Photoshop CC 2018.dmg (4.95 MB)

Raya Pro Panel 2.1 Plug-in for Adobe Photoshop CS5 – CC 2018

Name Raya Pro Panel v2.1.zip Size 123.5 MB Created on 2017-11-19 06:31:18 Hash 68ad289632f73af73c82924895d8652f8fb23b5e Files Raya Pro Panel v2.1.zip (123.5 MB) Download Download Descriptions for Raya Pro Panel 2.1 Plug-in for Adobe Photoshop CS5 – CC 2018 Name: Raya Pro Panel Version: 2.1 Requirements: Adobe Photoshop CS5-CC 2018 Web Site: http://www.shutterevolve.com/raya-pro-the-ultimate-digital-blending-workflow-panel-for-photoshop/ Overview The panel that makes Photoshop and Digital Blending simple. Raya Pro is one of the finest panels for Photoshop. It makes digital blending extremely easy – just a click of a button and the blending is done. Blend Exposures With Ease Works in ALL Languages 5 Instant Digital …

Copyright © 2019 Mac Torrent Download All Rights Reserved.

Pixel Film Studios – TransPanel: Kinetic – Kinetic Panel Transitions For Final Cut Pro X

Pixel Film Studios – TransPanel: Kinetic – Kinetic Panel Transitions For Final Cut Pro X

TransPanel: Kinetic is an exciting new pack of animated panel transitions designed specially for FCPX. TransPanel: Kinetic allows users to divide up each shot, and flip it into the next. These transitions include editable text and environment controls, along with numerous keyframe-less animations for added versatility. FCPX users can now create professionally styled animated transitions seamlessly with no effort.

Web Site: http://store.pixelfilmstudios.com/product/transpanel-kinetic/

Find more Pixel Film Studio Plugins

Panel Transitions with TransPanel: Kinetic in FCPX

60 Different Presets

TransPanel: Kinetic includes 60 different animated presets for users to add the their transition library. TransPanel: Kinetic gives users horizontally and vertically divided styles with numerous style controls, allowing users to customize each individual transition. Motion blur options are also included for added realism and style.

Fully Customizable Camera Controls

Advanced camera controls are just one of the many intuitive features included in TransPanel: Kinetic. FCPX users can change the camera path and angle of the focus point, allowing endless options and looks to be created within each transition. Users can also change the angle of view for more interesting perspectives in each preset.

Includes Editable Text

TransPanel: Kinetic includes editable text within the environment, that users can modify to fit each style of shot. Change the phrases and move them around in 3D space to make each individual transition look different from the last. Users can add in messages and keywords to match each project, quickly and easily.

Designed For Final Cut Pro X

TransPanel: Kinetic is designed as an FCPX exclusive. FCPX users can simply select the transition style they want to use, and apply it between clips on the timeline. Customization controls are located in the inspector window allowing easy access to alterations. Users can change the camera angles, environment, and text with just a few simple adjustments.


TransPanel Kinetic – Kinetic Panel Transitions For FCPX – Pixel Film Studios

Name Pixel Film Studios – TransPanel Kinetic.dmg
Size 35.26 MB
Created on 2017-09-06 09:08:56
Hash 988b46d183733def451f9d95fb682c67649acb73
Files Pixel Film Studios – TransPanel Kinetic.dmg (35.26 MB)

Express Retouch Panel 1.0 for Adobe Photoshop

Description

Name: Express Retouch Panel for Adobe Photoshop
Version: 1.0

Requirements:
 - Panel available for Photoshop CS5.0 CS5.5, CS6, CC, CC2014, CC2015+
 - Support all languages


Web Site: https://designbundles.net/professional-add-ons/5145-express-retouch-panel


Overview
Quick and quality auto-retouch.

Features:
- Quickt retouch by two color masks
- Auto Dodge & Burn
- Digital Texture
- Smart Contrast
- Run by hotkey
- Easy installation

Screenshots

Name ExpressRetouchPanelMac.zip
Size 3.06 MB
Created on 2017-05-11 09:53:41
Hash 91a9de78b8d21b30a434a65302ecaf02823263d0
Files ExpressRetouchPanelMac.zip (3.06 MB)

Lumenzia: Luminosity Masking Panel 3.0.2

Name Lumenzia v3.0.2.zip
Size 57.96 MB
Created on 2017-02-14 04:19:53
Hash 0669dbc18780390cefe52477472de10c86197b9d
Files Lumenzia_v3.0.2.zip (57.96 MB)

Descriptions for Description

Name: Lumenzia
Version: 3.0.2
Language: English
Requirements: Adobe Photoshop CS6 or later

Includes: Pre-Activation (install and play)


Web Site: https://gregbenzphotography.com/lumenzia/


Overview
Luminosity masks allow you to create gorgeous and realistic edits in Photoshop. Lumenzia allows you to use use them quickly and easily. Its advanced JavaScript engine handles all the luminosity masking complexity for you in the background, so all you need to think about is making beautiful images. 


How it works:
1. Preview to easily choose the right preset or custom mask.
2. Apply the preview as a selection or mask.
3. Refine by location/color, clean up rough edges, and paint on the mask non-destructively for perfect results.


Key benefits:
 ● Select and mask anything, visually! With Lumenzia, you get a full screen preview of the mask before you apply it. Interactively click on the image to select (or deselect) the tones/colors to the degree you wish. No guesswork with adding and subtracting channels. Isolate the mask to to specific parts of the image with a simple selection. And you can combine group masks to easily see the overall mask impact. It’s never been faster and easier to create or customize the right mask. And the masks are created in 16-bits, allowing for smooth transitions in extreme masks.
 ● Click to pick! You don’t have to know which mask to use, just use the built-in zone and range tools to create the right mask automatically.
 ● It’s stays out of the way. Lumenzia offers a compact panel with only the buttons you need, and completely eliminates the need for the channels pallet. This leaves room to easily see your images big and beautiful, even on a laptop screen. Every action in Lumenzia creates just a single history step, so you can undo anything with [ctrl]-Z. And because Lumenzia is programmed in JavaScript, it’s smart enough to take care of errors and other tricky situations for you.
 ● Simplify exposure blending. Automatically stack, align, and sort your exposures light to dark for blending.
 ● Smaller files. Lumenzia doesn’t use channels, so your files stay small. A typical TIF file from a Nikon D800 grows from 200MB to 1.4GB when creating channel masks, but would remain the same 200MB size in Lumenzia. And Lumenzia can combine group masks to significantly cut down on file size, often reducing file size a further 20-50%!
 ● Beautiful vignettes with ease. Just draw a selection around the target area to create a vignette of any size, sharp, or position in the image. The vignette can be easily modified, inverted (to lighten the center) or combined with luminosity masks (to avoid darkening shadows too much).


What's included?
 ● The Lumenzia panel
 ● Excellent support and a private support forum to connect with other Lumenzia users
 ● Free bonus #1: The Lumenzia Basics panel. Get quick access to commonly-used luminosity masking tools. Perfect for users who are new to luminosity masking, or those who don't wish to memorize a bunch of Photoshop shortcuts.
 ● Free bonus #2: Quick Start guide video to help you start enhancing your images immediately. 
 ● Free bonus #3: Over two hours of additional video tutorials and written materials to get the most out of both Lumenzia and luminosity masking


The Lumenzia panel features:
 ● Customizeable luminosity masking presets
 ● Zone masking system
 ● Zone pickers (select the right zone mask visually by clicking on the image)
 ● Range picker (select any range of midtones visually by clicking on the image)
 ● “Lighter/Darker” masks (select pixels relative to surrounding pixels)
 ● Refine masks to specific locations or colors in the image
 ● Combine masks (merge group masks to save space and see exactly what is masked)
 ● Split-screen to see the mask and image simultaneously
 ● “PreBlend” to automatically stack, align, and sort exposures for blending
 ● Custom vignettes
 ● Dodging and burningSaturation masks (color-specific vibrance control)
 ● Apply or replace masks on existing layers with a single click
 ● Luminosity and dust visualization tools to easily find and fix defects 
 ● Advanced sharpening methods for portraits (surface blur) and landscape (high pass)
 ● Quick access to training and support videos (via "tutorials" button)


System requirements:
 • Lumenzia is compatible with Photoshop CS6 - CC 2017 on both Windows and OSX.
 • Lumenzia does not support CS5 or earlier (however, you may wish to try my free luminosity masking panel/actions instead).
 • Note that the CS6 user interface functons the same, but looks somewhat different

Screenshots

Delicious Retouch Panel 3.0.6 (Photoshop CS6 – CC 2017)

Name Delicious_Retouch_Panel_v3.0.6.zip
Size 51.66 MB
Created on 2017-02-01 14:43:22
Hash 7fce416fbc5d2cece2c24c26c9d90864d00abcd0
Files Delicious_Retouch_Panel_v3.0.6.zip (51.66 MB)

Descriptions for Description

Name: Delicious Retouch Panel
Version: 3.0.6
Requirements: Adobe Photoshop CS6 - CC


Web Site: http://www.photoshopchef.com/downloads/delicious-retouch/


Overview
The all-new DR3 extension panel for Adobe Photoshop CS6 - CC 2015 is a set of easy-to-use tools designed to help photographers speed up their portrait, beauty and fashion retouching workflow.

All the tools you need to use the DR3 extension, right there at the top of the panel

“Delicious Skin” – automagically smoothens skin and eliminates skin imperfections while keeping things natural looking, what makes it a perfect tool for fast, subtle skin retouching. “Batch processing” function makes it even faster.

“Low Frequency Blur” – sounds too technical, but it’s actually an easy-to-use tool that allows you to smooth skin while preserving texture, all under your control just by rolling a sliders.

“Low Frequency Painting” – is a tool that let you paint on the image with brush tool without losing sking texture.

“Smart Healing” – awesome tool that saves you time cleaning skin. Instead of removing every single imperfection one by one, you can use Spot Healing Brush at huge brush size and it only applies to spots, facial hair etc., keeping the “good” skin untouched.

“Eyes & Teeth” – enhance iris, whiten whites and teeth in seconds using brush.

“Sharpen” – image sharpening with powerful “smart sharpen” option that protects edges from oversharpening.

“Stamp Current and Below” merges a copy of selected leayer and layers below, “Fill Layer Mask with Black” color, and “2-up View” that let you see and work on the same document at different zoom levels side by side.

Portrait Retouching with “Delicious Retouch 3” Extension in Photoshop CC

Screenshots